User Interface and Firmware
This page gives a high level overview of the user interface design of the coffee roaster. I discuss the management of responsibilities between the Nextion display and the Arduino controller and summarize the UI elements.
Back to Building The Control Board.
This page gives a high level overview of the user interface design of the coffee roaster. I discuss the management of responsibilities between the Nextion display and the Arduino controller and summarize the UI elements. This page also contains an overview of the heat modes and an explanation of the Auto mode.
The firmware for this project is located on Github here. The codebase is setup for Visual Studio code, but it has also been tested loading and compiling directly in the Arduino IDE.
Nextion Display and State Management

I designed the user interface for the roast controller around a Nextion 320x240 pixel display. The display has an onboard microcontroller which is used to manage most of the IO. The GUI is designed using software called Nextion Designer in windows and then downloaded to flash memory on the display. The Nextion software has built-in elements like sliders, waveform viewers, and buttons. This offloads much of the graphic design from the Arduino and speeds up development on projects like this one. The display connects to the Arduino over serial. A library called Easy Nextion Library available through the Arduino library manager and on Github here is used to manage the communication.
The Nextion interface allows some code to be run natively on its mcu. There are callbacks associated with each UI event (e.g. "Button Up" events) and callbacks when the various pages are loaded and unloaded. There are also configurable timers that call a function on a programmable interval. There is even a header of GPIOs on the Nextion display, so some simple projects could be implemented with the display as the only MCU.
This was my first time using a Nextion display and I found that the onboard programming was limited. The scripting language used to program behaviors is very simple -- it is not capable of performing floating point math and other timing-critical operations. The syntax formatting is also very particular and non-standard. I ended up using the display as primarily a front-end for the Arduino and aimed to keep all of the state information and logic for the program in the Arduino code-base. This made the project cleaner and easier to maintain than it would be if I split the state information and logic between the display and the Arduino.
Here is a screenshot of the main UI:
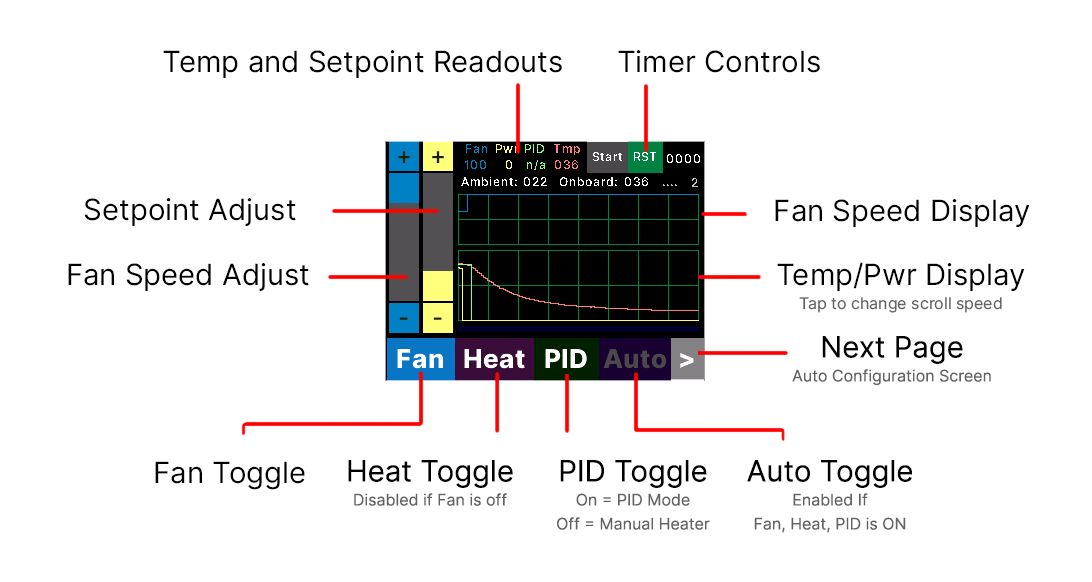
The roaster has various states depending on which of the buttons along the bottom are toggled on and off. There are also dependencies between the various button states. For example, the heater button can only be enabled when the fan is on. Also, if the user turns off the fan the heater will also be disabled. This is important to prevent the heater coils from overheating – they are designed to have air flowing across them.
Here is the state diagram describing the various states of the controller:
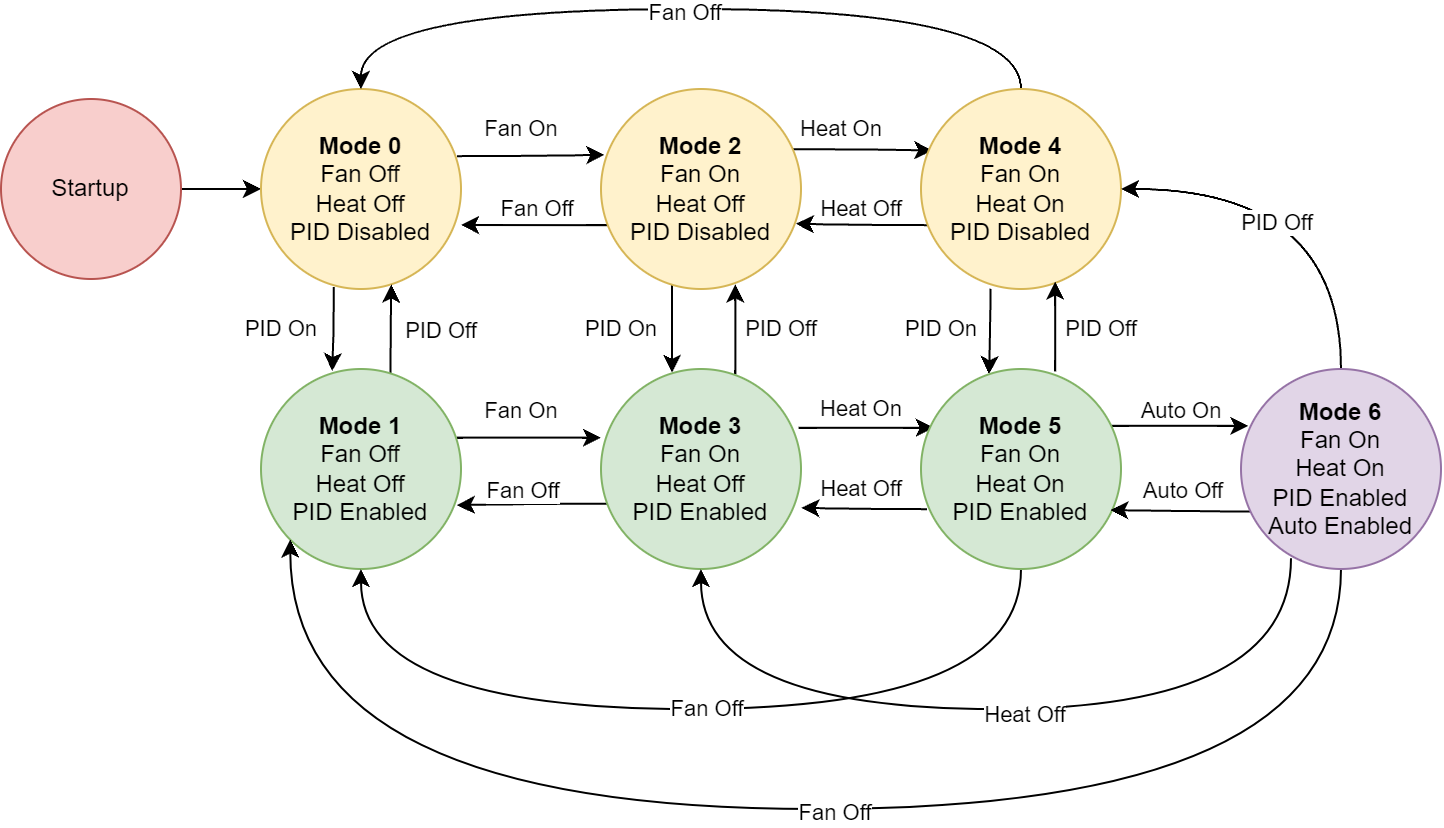
Every time a button on the Nextion display is pushed it sends a string over serial to the Arduino indicating the button that was pushed. The Arduino then determines the state to enter based on the current state and the button that was pushed. Then the Arduino reconfigures the Nextion UI according to the new state and sets up the new mode of operation. This requires more back-and-forth over the serial comms, but ultimately makes the code much easier to develop and maintain. All of the logic for the state machine can be seen in state.cpp.
Temperature Control
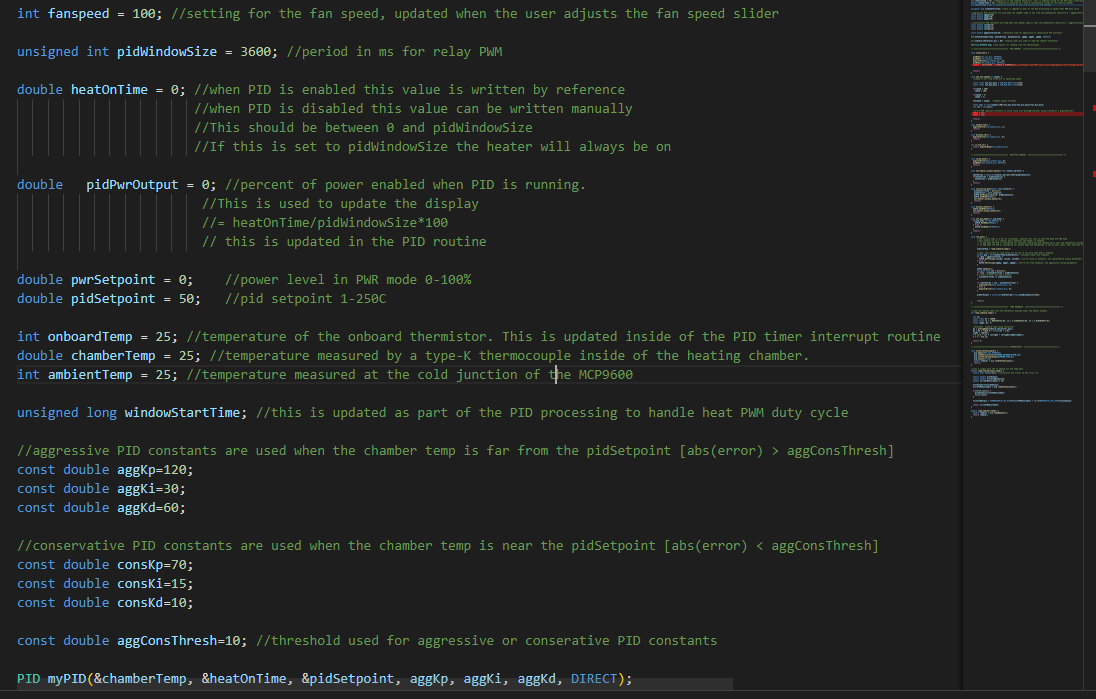
The roaster has two modes of temperature control. In "PWR" mode, the user sets the duty cycle of the heating element directly. The duty cycle can be set from 0-100%. By default, the PWM period of the heater is set to 3600ms. This can be adjusted by changing the variable "pidWindowSize" in hardware.cpp.
When PID is enabled the user inputs a setpoint for the roaster to maintain. The setpoint can be set from 1-250C. The PID is implemented using the "PID_v1" library available from the Arduino Library Manager and on Github here. The library has two examples I found particularly helpful: PID_RelayOutput and PID_AdaptiveTunings. PID_RelayOutputs demonstrates how to map the output value of the PID algorithm to a relay duty cycle and PID_AdaptiveTunings demonstrates how to use two sets of PID tuning values depending on the amount of error. Both are used in the codebase.
I struggled at first when tuning the PID values because I was using Kp, Ki, and Kd constants that were way too small. After inspecting the library code, I realized that the constants need to be scaled according to the output range, which is 0-3600 ms. This could be normalized in the library so that the PID values are more reasonable and comparable to other systems, but this would require extra realtime computation on the already resource-constrained Arduino, so I just scaled the values up during tuning. The PID values can still use more tuning with actual coffee beans, but here is what they are set to as of the time of this writing:
//aggressive PID constants are used when the chamber temp is far
//from the pidSetpoint [abs(error) > aggConsThresh]
const double aggKp=120;
const double aggKi=30;
const double aggKd=60;

//conservative PID constants are used when the chamber temp is near
//the pidSetpoint [abs(error) < aggConsThresh]
const double consKp=70;
const double consKi=15;
const double consKd=10;
This provides good tracking with minimal oscillation without beans, but more tuning is required for improved results with beans – I usually maintain a temp within 2-3 degrees during roasting, but the output oscillates more than I like. These values may need to be adjusted depending on your particular roaster and temp probe placement.
Auto Mode
Auto mode allows the user to define a temperature curve that the controller will try to maintain over the course of a roast.
A particular challenge with auto mode is the user interface design. I want the roaster to be a standalone device that does not require a computer or supplemental screen for setup. This means all of the auto mode parameters must be inputed using a 320 x 240 px display. Here is the setup screen for auto mode which can be reached by hitting the grey arrow in the bottom-right corner of the display:

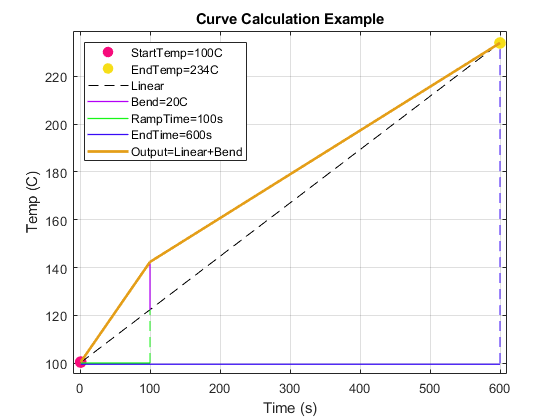
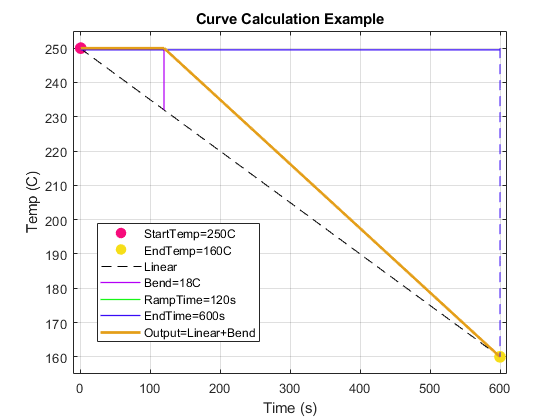
I think this strikes a reasonable balance between flexibility and user interface clutter. Five parameters are used to set the target temperature curve:
Start: Starting temperature in degrees C. Use the Exclamation button to set to the current measurement temp.
End: End temperature in degrees C.
Bend: Amplitude, in degrees C, of a "kink" in the curve
Ramp: Time, in seconds, where the peak of the Bend should occur.
Time: Overall time of the roast.
After hitting the "calculate" button, the values are sent to the Arduino where the curve is computed and the display is updated.
Here are a couple of examples of the curves generated:
Below is a video of the auto mode operating. This is recording from the Nextion software debugger, but connected to the actual hardware through a serial link – so the data output is real.
Auto mode is still a work in progress and I expect it will change and improve as I spend more time learning about coffee roasting. The mode functions well as-implemented, but I suspect I will introduce alternate methods of defining the target curve and additional enhancements.
A current limitation is that the auto mode does not adjust fan speed. Ideally, the fan speed should also be able to be adjusted with some kind of piecewise definition. This is particularly important because the roaster cannot maintain full temperature if the fan is set to maximum speed.
If you have experience coffee roasting I would love to hear from you about parameters I should add to improve the auto functionality of the roaster. I also plan to learn more about roast profiles as I continue roasting coffee. Please reach out if you have any suggestions or tips!
Continued in Conclusion and Summary